Get Started with Arduino & p5.js
This example will demonstrate how to connect FLEXIDOTS hardware (Arduino Nano BLE 33) with a p5.js sketch.
Components List
Microcontroller:
- Arduino Nano 33 BLE
- Arduino Nano Shield Module
Input / Output
- Button Module
-
Vibration Motor Module
Power
- 9V Battery Module
Attachment
Band*1
Connector*1
If you do not have all the above components, please refer to Hardware page to get the kit.
About Bluethooth® Low Energy & ArduinoBLE
In order to communicate between hardware and software, we will use Bluetooth Low Energy (BLE) as a wireless protocol to communicate. The fundamental logic of how BLE works is unlike standard Bluetooth communication based on an asynchronous serial connection (UART), a BLE radio acts like a community bulletin board that the devices can read and write. The information on this bulletin board is called characteristic. Devices that are connected to this bulletin board can be notified when a change happened, or update the characteristic. For more information about BLE, you can refer to this documentation from Adafruit.
Arduino Nano 33 BLE stands for the microcontroller which is operating under 3.3V and supports Bluetooth Low Energy. To activate BLE, It requires an additional library called ArduinoBLE. For detailed information, you can refer to ArduinoBLE documentation.
Communication
In this example, we will create a basic two-direction communication, which the hardware system can control the p5 sketche, and the p5 sketch can controll the hardware system.
Hardware
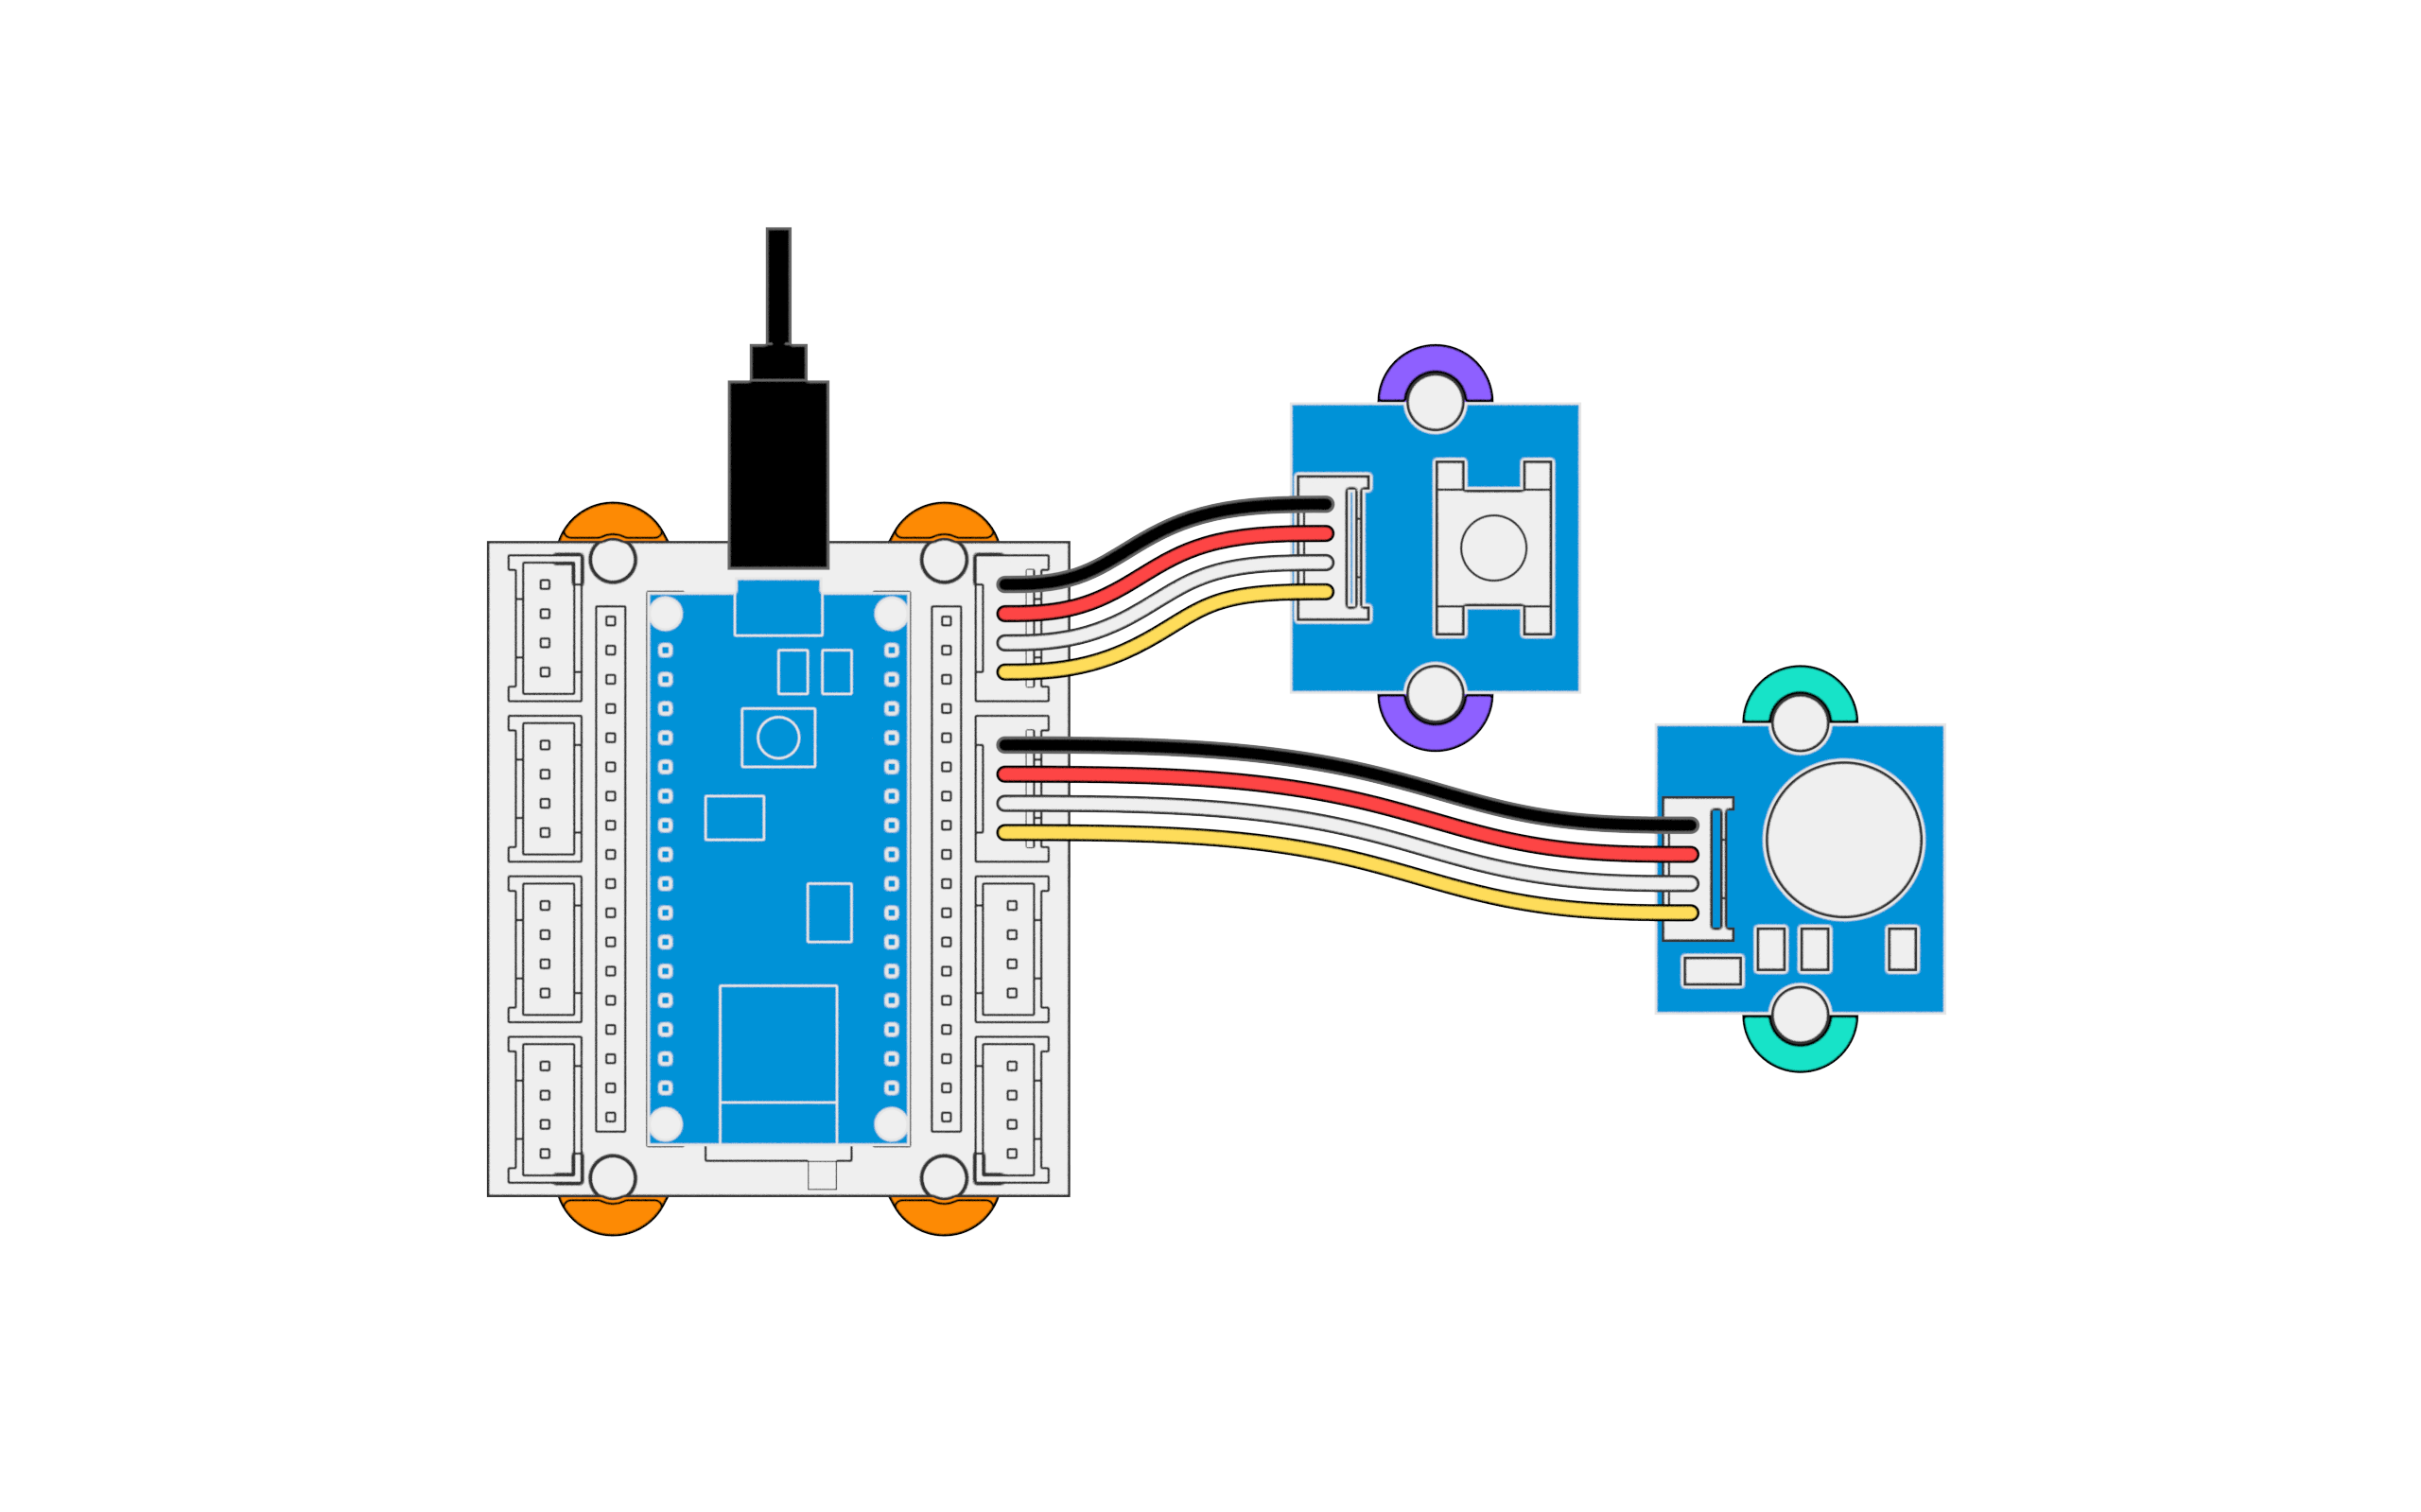
1️⃣ Assemble a FLEXIDOTS system as shown in the Get Started with Arduino
page,
this system contains an

⚠️ Make sure to unplug the battery module before connecting the Arduino to the computer with a USB cable. Multiple power sources may damage your microcontroller or your computer.
2️⃣ You can upload the code to the Arduino, you can also download the code here.
        /*
        FLEXIDOTS Get Started with Arduino & p5.js
        https://studiohuahong.github.io/FlexiDots/get-started/get-started-arduino-p5.html
      */

      #include

      const int ledPin = LED_BUILTIN; // set ledPin to on-board LED
      const int buttonPin = 2; // set buttonPin to digital pin 2
      const int vibrationPin = 4; // set vibrationPin to digital pin 4

      BLEService ledService("19B10010-E8F2-537E-4F6C-D104768A1214"); // create service

      // create switch characteristic and allow remote device to read and write
      BLEByteCharacteristic ledCharacteristic("19B10011-E8F2-537E-4F6C-D104768A1214", BLERead | BLEWrite);
      // create button characteristic and allow remote device to get notifications
      BLEByteCharacteristic buttonCharacteristic("19B10012-E8F2-537E-4F6C-D104768A1214", BLERead | BLENotify);

      void setup() {
        Serial.begin(9600);
        //while (!Serial); //disable this line, I have no idea why they want this line

        pinMode(ledPin, OUTPUT); // use the LED as an output
        pinMode(vibrationPin, OUTPUT); // use the vibration motor as an output
        pinMode(buttonPin, INPUT); // use button pin as an input

        // begin initialization
        if (!BLE.begin()) {
          Serial.println("starting Bluetooth® Low Energy module failed!");
          while (1);
        }

        // set the local name peripheral advertises
        BLE.setLocalName("Flexidots Arduino Nano BLE");
        // set the UUID for the service this peripheral advertises:
        BLE.setAdvertisedService(ledService);

        // add the characteristics to the service
        ledService.addCharacteristic(ledCharacteristic);
        ledService.addCharacteristic(buttonCharacteristic);

        // add the service
        BLE.addService(ledService);

        ledCharacteristic.writeValue(0);
        buttonCharacteristic.writeValue(0);

        // start advertising
        BLE.advertise();

        Serial.println("Bluetooth® device active, waiting for connections...");
      }

      void loop() {
        // poll for Bluetooth® Low Energy events
        BLE.poll();

        // read the current button pin state
        char buttonValue = digitalRead(buttonPin);

        // has the value changed since the last read
        bool buttonChanged = (buttonCharacteristic.value() != buttonValue);

        if (buttonChanged) {
          // button state changed, update characteristics
          ledCharacteristic.writeValue(buttonValue);
          buttonCharacteristic.writeValue(buttonValue);
        }

        if (ledCharacteristic.written() || buttonChanged) {
          // update LED, either central has written to characteristic or button state has changed
          if (ledCharacteristic.value()) {
            Serial.println("LED on");
            digitalWrite(ledPin, HIGH);
            digitalWrite(vibrationPin, HIGH);
          } else {
            Serial.println("LED off");
            digitalWrite(ledPin, LOW);
            digitalWrite(vibrationPin, LOW);
          }
        }
      }
If you press the button, even the Arduino is not connected to BLE, the on-board LED and the vibration motor will be activated.
Software
To import the p5.ble.js library, copy the following code in the index.html file
        <script
      src="https://unpkg.com/p5ble@0.0.7/dist/p5.ble.js"
      type="text/javascript"
      ></script>
In this example, first, you need to connect to the FLEXIDOTS hardware. Click the connect button and you will see the FLEXIDOTS Arduino is shown, then pair the device.
You will control the white circle by your cursor in this p5 sketch. Everytime if the white circle collides with the blue circle in the middle, the sketch will update the vibration notification and trigger the vibration motor hardware. If you press the button, the sketch background color will change into teal color. This is a very essential example to demonstrate a two-direction communication.
3️⃣ You can try the p5 sketch on p5 editor, or you can download the code here.
Additional Notes
The BLE communication mechanism used for updating characteristics has certain limitations with respect to the speed of information delivery. By default, the p5 sketch refreshes at 60 frames per second, which may cause GATT operation congestion if the p5 sketch is updated in real-time with BLE characteristics. To overcome this limitation, a custom GATT interval countdown function that allows the p5 sketch to send updates at intervals:
        //send notifications at intervals to prevent GATT operation congestion
        let GATTinterval = 20;
        let GATTsendData = false;
        //avoid send duplicate notifications to prevent GATT operation congestion
        let avoidDuplicateData = true;
In the function draw( )
        //countdown the GATTinterval to send notifications at intervals to prevent GATT operation congestion
        if(GATTinterval > 0 ){
          GATTinterval -= 1;
          GATTsendData = false;
        }else{
          GATTinterval = 20;
          GATTsendData = true;
        }

        if(myBLE.isConnected() && GATTsendData == true){
        //update characteristics here
        }